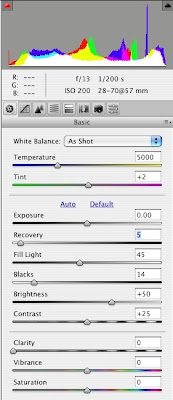
Photoshop CS3 has added two wonderful new features in Adobe Raw Converter. They are Recovery, for salvaging highlights, and Fill, for bringing out detail in the shadows.
Look at this example. The highlights are blown out, and the shadows plugged up. But by using the Fill slider, I was able to pull back information that seemed lost. And the Fill allowed me to pull a bunch of detail from the shadows.
Yes, some of this could have been handled a couple of other ways. I could have used Curves once the image was in Photoshop to help the shadows. Or, I could have done two conversions, one for highlight contro, one for shadow control, and then blended them as two layers in one file.
But with these new features, I can get a lot closer to where I want to be a lot faster, which means my workflow is improved.
Just take a look at the difference between the image above, which have the adjustments shown in this screenshot, and the image below that which is the straight conversion.

Here is the dialog box for the converter, with the settings I used.


2 comments:
I won't have CS3 unstalled on my new PC until next week but I'm anxious to use it and encouraged about the RAW processing options like this one. Thanks for sharing.
I won't have CS3 unstalled on my new PC until next week but I'm anxious to use it and encouraged about the RAW processing options like this one. Thanks for sharing.
Post a Comment