Effective May 10, 2009, we have moved the blog to a new server. Please bookmark our new site, http:www.abetterphotograph.com, and visit us there.
Thanks!
Sunday, May 10, 2009
Wednesday, April 8, 2009
Adding spontaneity to make great portraits

One way to make family portraits feel more real is to keep shooting well after the posed image you set up.
I've talked about it before, but one of the reasons why shooting digitally is so great is that you don't have film and processing costs. All you have is a memory card, which can be reformatted and reused. So after you have shot the picture of your favorite people in a pretty location, keep shooting when they sit down and relax.
In this example, I sat next to my friend Paul and his son Parker, and actually held the camera down low near the ground. I used a zoom lens set at 35mm, set the auto-focus on a wide spread pattern covering all the focus points and just clicked away while they played. Because both of them were focused on enjoying their moment together, the images were much more relaxed, spontaneous and intimate.
Wednesday, March 11, 2009
Using color to make great portraits

It's always fun to shoot portraits, and at the same time you want to make one that is unique. So in sizing up the opportunity, besides looking at the features of the person you are shooting, try to take other things into account to make the image special.
In this case, I certainly wanted to make an image of Tasha's warm, smiling face. But where to place her? When I looked around, I found this wonderful melon colored wall that worked well as a background. Certainly it was nice because it was a simple background and allowed the eye to focus on her face and not be distracted by other elements like texture or pattern. But the real key is that the wall is the complimentary color to the aqua dress she was wearing, so it makes the whole image pop.
So when you are shooting a portrait, look for color to help you make an image that is unique.
Friday, February 27, 2009
Control Depth of Field to Take Better Photographs

One of the biggest shifts I encourage my students is to make in their growth as photographers is to take control of the camera functions. In the early stages of shooting, many people rely on the camera's automatic exposure controls capability. They set the camera on Program mode, and shoot away.
One of the first steps in taking creative control in evolving your vision is deciding what the viewer's eye will focus on. Depth of field is one of the tools in accomplishing that. Simply put, depth of field is the distance in front of, and behind the point your focus on that is in focus. A photograph shot at a wide open aperture like f2.8 will have less depth of field than an image shot at a small aperture like f16.
In this example, my interest is in having the viewer look at the texture of the wooden buggy at a historical site. In the image above, the aperture is set at f2.8, so the focus is quite shallow. The background is blurred and the eye focuses on the corner near the wagon wheel. But in the image below, notice that using a small aperture of f16 allows the rocks and winter grass in the background to compete with the main subject because they are much sharper.

So my recommendation is that when you are making an image, think about what you want the viewer to see, and use depth of field as an ally to accomplish that.
Monday, February 16, 2009
Available light photography vs on camera flash
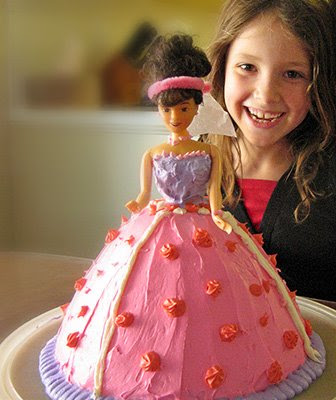
Most point and shoots have an auto flash setting so that when you are indoors, it simply guesses the best exposure. But that's not always the way to go.
For example, if your subject is near a window, you could raise the ISO setting, and shoot with the available light. The advantage is that unlike the small point source of the on-camera flash, you will have a large broad, palnterly light source.
And the second advantage is that instead of the flatness rendered by a light coming right from the camera (see the image below), you can position your subject so that you have directional lighting in the image. The result is that there is a more three dimensional quality to the photograph.
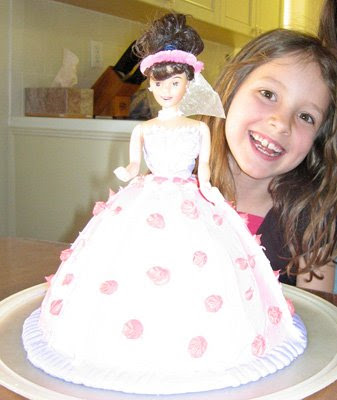
Obviously, this would not work if it were very dark inside, but when the light levels allow, try this technique for some lovely results.
Sunday, February 8, 2009
Making good photographs in bad weather
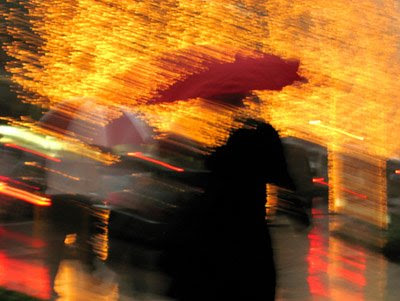
Shooting on location is not all blue skies and dramatic color. Sometimes, you are in a great location, but the weather is bad. But should that stop you from looking for opportunities for images?
In fact, bad weather creates a whole new set of possibilities for pictures. And here's a good example. I was in New York recently, and the weather was overcast with rain showers. Certainly I could have just kept my head down under my umbrella and scurried from one dry interior to another.
But the wet streets and the shapes of the umbrellas of the passers-by was intriguing. And because the light level was so low because of the rain, I could shoot at slow shutter speeds giving me the opportunity to create a sense of activity and movement.
Monday, December 15, 2008
Getting great winter photographs
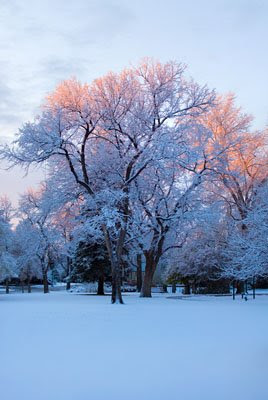
One of the challenges of getting great winter photographs is the lack of color in a snow covered scene. The world is mostly white with muted shades of browns, which can be exciting if you are shooting black and white pictures. But what if you are shooting color?
I find one of the best solutions is to shoot either at sunrise or sunset, where you get get the warm light associated with those times to add strong, dramatic accents to a colorless world. The added advantage of shooting sunrise is that there will be less footprints in the snow to break up the pristine quality of the scene.
Subscribe to:
Posts (Atom)

