Wednesday, April 30, 2008

Waiting for the light


The expression “patience is a virtue” is clearly evident in doing landscape photography. I often find that the difference between a pleasing image and a powerful image is simply waiting for the light to add drama to the scene. It could be taking the time to allow a cloud to create interesting patterns or shadows as it passes overhead, or waiting for the sun to drop behind a rock to highlight a feature in the scene you are capturing.

Just look at the difference between the image below, and the image above. Though taken just a couple of minutes apart, a cloud passing overhead takes a picture that looks a bit flat, and creates more focus on the central part of the rocks in the image above. The result is that the eye is guided to the texture and shapes of the rocks in a better way, and this makes for a more impactful image.


Here’s another example. When I first saw this scene, and snapped the first picture, the light was flat. By waiting a few minutes for an opening in the clouds and allowing the light to travel across the land until it illuminated the rocks, I got better separation of the rock surfaces and greater depth overall.


There are times were we have to hurry, but when shooting landscapes, having patience to wait for the light is clearly worthwhile.

Sunday, April 27, 2008

The Biggest Filter


Often, I when I am teaching a workshop and ask why people are attending, someone will say “I take pictures, but I don’t seem to get in an image what I had in my mind at the time I did the shoot.”

This person is not alone in their lament. The reality is that the brain does an amazing job of filtering what we see, and thus what we end up with may not match the vision we had when we were attracted to a situation. True, there are other things that influence the image you end up with, such as cropping, angle of view, and choice of lens, just to mention a few.
But one of the biggest factors is how our brain edits the external and forces it into the box our desires have created for the fulfillment of our photographic ideals, whatever they may be.

I’m amazed at how often I drive by a location, and see a wonderful opportunity, only to return and find out there were power lines disrupting the clean lines of a building. Or a fire hydrant marring the simple lines of a street scene.

In this situation, I was driving on a one way street that had three lanes of traffic, and I was in the far left lane. I noticed a building on the right side of the street that had several fruit trees in bloom, and the contrast of the pink flowers against the rust colored exterior wall was striking. I decided I would return the next day when I could make some time to spend shooting.

On my return, I parked my car on a side street, turned the corner and walked alongside the scene I was so enamored with. To my dismay, there were stakes holding the trees in place, so I could not shoot from the top to the bottom of the tree. There was even a utility box next to one of the trees.


This is the point at which I remind myself of the big brain filter I carry around with me, and laugh at myself. And it is also the time where I think about what it was that brought me to this place to photograph in the first place, and see if I can synthesize that into a different image that still made the same point.

True, it would have been lovely to get a whole tree framed by the rust colored wall, but how else could I frame the image to give that contrast of pink and purple, light and shadow? I started with a wide angle lens, and looked at including a number of branches and a bevy of blooms. As I continued, I moved to a telephoto lens and kept reducing the picture to the essence of color and tonal contrast. Here are some of the results.


Are they better or worse than the symmetrical composition of a full tree framed by the building I saw in my mind? I’ll leave that for the viewer to decide. But the exercise in examining the core reasons for wanting to shoot the image allowed me to get around the big brain filter and get the essence of the image I had in my mind. And that's the lesson I want to share.

Monday, April 21, 2008

Always ready


I always have a camera with me. At least, a good point and shoot is in my daybag. But most of the time, I have a DSLR in the car with me. Here’s a good example of why I do it.

A late spring storm brought wet snow to our area, and beautiful coating of the white stuff on the branches of the trees. The look is completely different than that of mid winter, where the snow would not stick to the branches and just pile up below.

I was headed to a meeting, but stopped, grabbed this image, and continued on my way. It’s always good to be ready.

Thursday, April 10, 2008

Texture


Here’s a fun example of how to use texture to create an interesting image.

I was walking along a trail in the redrock country of Utah, surrounded on all sides by big, undulating stone shapes. By themselves, of course, they can be wonderful subjects. But when I saw this dead tree coming up from a group of rocks, the contrast in texture was stark, especially against the clouds that added yet a third texture.

Another treat was that there were three distinct values of light and dark (white in the clouds, midtones in the rocks, and near black in the tree) so there was great contrast as well. You’ll also note that I am using the rule of thirds, both horizontally in how I place the tree off to the right, and vertically by having the tree top two-thirds up the image.

The result is a nice convergence of simple elements where texture can be the hero of the image.

Tuesday, April 8, 2008

Photoshop’s Recovery and Fill Tool


Photoshop CS3 has added two wonderful new features in Adobe Raw Converter. They are Recovery, for salvaging highlights, and Fill, for bringing out detail in the shadows.

Look at this example. The highlights are blown out, and the shadows plugged up. But by using the Fill slider, I was able to pull back information that seemed lost. And the Fill allowed me to pull a bunch of detail from the shadows.

Yes, some of this could have been handled a couple of other ways. I could have used Curves once the image was in Photoshop to help the shadows. Or, I could have done two conversions, one for highlight contro, one for shadow control, and then blended them as two layers in one file.

But with these new features, I can get a lot closer to where I want to be a lot faster, which means my workflow is improved.

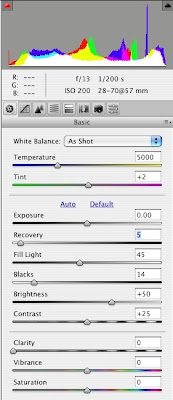
Just take a look at the difference between the image above, which have the adjustments shown in this screenshot, and the image below that which is the straight conversion.


Here is the dialog box for the converter, with the settings I used.

Sunday, April 6, 2008

Travels with Charlie


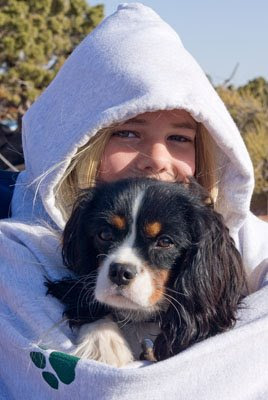
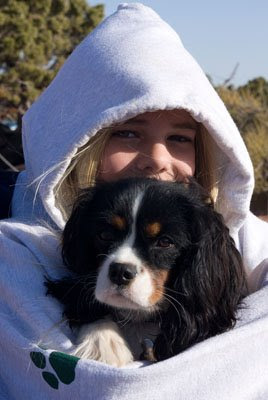
Taking a great picture of your pet can be challenging. Here’s one tip I think is important when your friend has both dark and light features.

Getting a good exposure can be difficult if you shoot with direct sunlight (either front or side lit) on your pet. That’s because with the extreme contrast in that kind of lighting situation, either the shadows will be too dark, or the highlights will be blown out. The image below is exposed for highlight detail, and look how the shadows plug up.

The better solution is to have your subject backlit. That reduces the contrast so the film or digital sensor can handle the range of exposure from shadow to highlight. Also, it will create some nice highlights in the hair or fur at the back edges, separating your pet from the background and adding a sense of depth. The top photograph shows that approach.

Just look at the difference in this portrait of Charlie. And just think how much happier he was without having to squint!