Monday, December 15, 2008
Getting great winter photographs
One of the challenges of getting great winter photographs is the lack of color in a snow covered scene. The world is mostly white with muted shades of browns, which can be exciting if you are shooting black and white pictures. But what if you are shooting color?
I find one of the best solutions is to shoot either at sunrise or sunset, where you get get the warm light associated with those times to add strong, dramatic accents to a colorless world. The added advantage of shooting sunrise is that there will be less footprints in the snow to break up the pristine quality of the scene.
Friday, October 17, 2008
Great fall photographs
Fall is one of the most exciting times to be out shooting landscape images because of the spectacular color found in the trees dotting the hillsides. Here's one tip for getting a great photograph when you get out there.
When you are surveying the opportunities while you are hiking or driving, look for situations where the trees are backlit. That's because the added contrast of the leaves being lit from behind will make them more luminous, add more depth, and makes the color pop off the page. Just look at this example to see what I mean.
Friday, August 29, 2008
WHAT TO PACK FOR A PHOTO TRIP PART IV
There are a lot of things I've been able to shed from my pack when I head out the door to shoot with a digital camera. Color compensating filters, for example, used to adjust the color of how film sees light in different conditions is easily replaced by one of two methods. You can either use preset or custom white balance settings in shooting to affect how the sensor reads the existing light, or shift the color in post production with the color balance adjustment layer in Photoshop.
But one thing I still carry for digital photography is my polarizer filter. Yes, there are some Photoshop plug-in filters that emulate it, but I still prefer to have the real thing in my camera bag. Why? Well, a polarizer is a great tool for making a sky look darker and richer than what the scene would look like without. The effect is particularly noticeable when you are shooting a subject that is in the shade, but the sky is still visible. That's because you are opening up the exposure from the full light exposure to capture detail in the shaded areas. But along with that, you are lightening the sky. Using a polarizer compensates for that overexposure of the sky, and makes it look more natural. Just compare the image above with a filter, to this image below that does not have one.
But be aware that a polarizer works at it's best when aiming 90 degrees from the sun. Shooting into the sun, or directly opposite will have no effect. In between, the effect increases as you approach the full 90 degree differential. In this example, I am shooting with the sun in the eastern sky close to sunrise, and I am shooting straight south.
Wednesday, August 27, 2008
WHAT TO PACK FOR A PHOTO TRIP, PART III
When it comes to lenses to carry on a trip, it's good to have a range so you can cover a variety of situations. And with today's technology, zoom lenses often come close to or match the quality of prime, fixed focal length lenses.
If you are shooting digitally, you want to keep in mind the camera sensor factor before choosing a lens. A 17-35mm lens for a full frame chip becomes a 27-56mm lens when used with a smaller chip with a 1.6X factor. That's a significant difference in coverage, and if you love to shoot wide angle, it's something to consider.
The same effect is a consideration when choosing which telephoto lens to take. A 70-200mm zoom becomes a 112-320mm lens when used with a chip with a 1.6X factor.
I always try to pack as light as possible, but insure that I have a bit more focal length range than I think I will need if I can fit the extra lens in my bag and am willing to carry the extra weight. I might think I am only going to be shooting broad landscape images that show scale and intimacy, but along the way, I might be surprised by a scene where a telephoto lens makes a more succinct statement, as the image at the top exemplifies.
Tuesday, August 26, 2008
WHAT TO PACK FOR A PHOTO TRIP, PART II
Visiting in more detail the overview article I wrote on what to pack for a photo trip, I want to cover the specifics group by group. So in this article, I'm going to talk about the items in the camera gear group, which are:
1-Camera
2-Camera manual.
3-Wide angle zoom lens (minimum 24-70, possibly 14-35 as well)
4-Telephoto lens 70-200mm
5-Lens extender 1.4X
6-Polarizing filter
7-Graduated neutral density filter
8-Filter holder
9-Lens cleaning solutions (bulb brush, lens cleaning tissue or microfiber cloth, and fluid)
10-Tripod and cable release (optional)
11-Portable flash (some cameras have these built in)
In this brief article, I want to talk about the value of taking the camera manual on location.
These new digital cameras are computers, and they have tremendous capabilities. Even for someone who has been in the business for years, I sometimes find it a bit overwhelming when I get a new camera. So my suggestion is to be sure to take your manual along until you know the camera functions inside and out.
It's a bit like loading film onto darkroom spools, or loading 4x5 film into holders in the dark. You want to be able to do things without even thinking about them. I would suggest practicing the possible scenarios you might be faced with before you go out to shoot.
Make sure you understand how to set the camera to shutter priority mode, aperture priority mode, change the metering mode, change the auto focus points in the viewfinder, add exposure compensation, how to playback images and how to zoom in on them to check focus and composition. And bring the manual along in case you forget these things, or need access to a more obscure function.
Hesitating because you do not know how to make the camera do something will result in missed images. Avoid the frustration, and carry your manual.
Monday, August 25, 2008
WHAT TO PACK FOR A PHOTO TRIP
Whether going out for a one day excursion around town, or traveling overseas for an extended photo expedition, the key is making sure you have the right gear so you can capture those great images.
Let's start with the photo equipment itself. This pertains to 35mm gear. Lens choices in larger formats would be different.
Camera
Camera manual
Wide angle zoom lens (minimum 24-70, possibly 14-35 as well)
Telephoto lens 70-200mm
Lens extender 1.4X
Polarizing filter
Graduated neutral density filter
Filter holder
Lens cleaning solutions (bulb brush, lens cleaning tissue or microfiber cloth, and fluid)
Tripod and cable release (optional)
Portable flash (some cameras have these built in)
SPECIFIC TO DIGITAL CAMERAS
Charger and an extra battery
Memory cards
Card reader
Laptop with DVD burner, back up hard drive or photo storage solution
SPECIFIC TO FILM CAMERAS
Film of various ISO ratings
Color compensation filters and filter holder
Extra batteries
GRIP EQUIPMENT AND MISCELLANEOUS
Gaffers tape
Rain protection
Chamois or soft cloth to dry off camera gear
GPS for noting locations (some cameras are coming with this built in)
Notepad or voice recorder to help with cataloging images later (some cameras have microphones built in)
Guidebooks, maps or other research material for the location
Food and water
Good shoes that can support the extra weight, and keep you comfortable
Friday, August 22, 2008
TAKE GREAT PICTURES IN CLOUDY WEATHER
More often that we might like, we end up at a location where the opportunities for photographs are quite good, but the weather is not. An overcast sky that is uniformly grey can be a big damper in creating beautiful scenics, so what do you do?
One possibility, of course, is the shoot the scene and add a sky later in post production. Although this can be successful in some situations, you have to be careful that the sky you add looks believable.
The other option is to look for photographs that do not include the sky, thus eliminating the lackluster quality it brings to the image making process. The first thing I would suggest is to look for a composition that shows as much of the landscape as possible without including the sky.
This is also great time to hone your observation skills, and zoom in on details. Start looking for parts of the landscape that are interesting, things like streams, rock formations, flowers. All can be great subjects in the soft light the overcast sky provides. For example, the lower light level means you can shoot with slower shutter speeds to get motion blur in a stream. And the same soft light allows you to see patterns in rock formations without the harsh contrast (and shadows) created by a sunny sky.
Friday, August 1, 2008
Using Open Shade to Make Better Photographs
Often, we have an opportunity to take a spontaneous photograph of a friend outdoors, on a bright sunny day. If the sun is high up in the sky, it's easy to end up with a picture where the person's eyes are in deep shadow, and they are squinting.
When a situation like that arises, it's time to look around for open shade. Maybe there is a tree close by that you can put the person under, or a doorway they can stand in (as in the example above).
Or maybe there is an overhang on a building. In the situation below, I put the subject just behind where the sun would have hit her face directly under the roofline of the shed. That way, the exposure was still at a high enough shutter speed that I could hand hold the camera, but I could get the benefit of the soft light provided by the overhang.
Whatever the options, look for opportunities to get your subject out of the harsh, overhead light, and into open shade. The results will certainly be worth the extra effort.
Sunday, May 25, 2008
Depth of Field
One of the most important concepts to understand is depth of field, which is the distance in front of, and behind the subject that will be sharp in relation to where you focus. The general rule of thumb is that the greater the ƒ-stop number, the more depth of field you will have. So, for example, at ƒ22 you will have a lot more in focus in front of, and behind your subject than you will at ƒ4.
The benefit of understanding this, is that different subjects benefit from using more or less depth of field. Landscapes, for example, benefit from greater depth of field because you can keep the foreground and background sharp. So you can keep a rock in the foreground in focus, as well as the mountains in the background.
But for portraits, the reverse is generally true. Although in environmental portraits there may be an interest in keeping the surroundings sharp, for the most part, we want to separate our subject from the background as much as possible. So shooting with a shallow depth of field is the way to go.
Just look at this portrait, taken on a basketball court. The important thing here is the personality and expression of the person, so allowing the background to go soft is a great solution.
But what if even shooting wide open (in this case, ƒ4) leaves some areas sharp because they are in the same plane of focus as the subject?
In this case, I duplicated the background layer, used guassian blur on the duplicate layer, then added a mask and protected the person’s face.
Look at the difference in this detail snapshot.
The result is that I’ve added more separation between the person, and the distracting pattern of the fence.
Saturday, May 24, 2008
Add Some Romance
Digital imaging can be powerful ally in many cases for rendering fine detail. But sometimes, it’s just too clinical.
I was shooting a video with a dancer, and between takes, she sat down to adjust her shoes. My eye immediately saw the wonderful play of light on her form, and I asked her to wait for a moment while I grabbed a still camera. We shot just five frames, and then we went back to shooting video.
When I brought the image I liked best into Photoshop, I felt like I had captured the light and composition the way I wanted. But it seemed to me that there was too much detail information in the floor that in the end distracted from the feeling I wanted to convey.
The quick solution was to use the Vignette Blur filter in NIK Color Efex 3.0 to soften the background and keep the focus on the dancer.
Just compare the original image below to the one above. I think you’ll agree that adding a little romance helped make a more pleasing image.
Photosynth
Check out this amazing new technology http://www.flixxy.com/photosynth-digital-photography.htm.
I can see some incredible possibilities, especially for photographer's websites, cataloging, and location scouting.
Tuesday, May 20, 2008
Photographing sculpture
With summer vacations coming up soon, lots of us will be visiting museums in far away cities. We’re bound to be surprised, impressed or possibly even amused by some the work we see, and may want to bring home photographs of the inspiring piece.
Such was the case recently, when I saw the work of sculptor Patrick Dougherty, who fashions tree branches into amazing structures. Sometimes the work is free-standing, but often he weaves his work into existing landscapes and the results are simply remarkable. Just take a look at some of the images, and videos at his website, www.stickwork.net.
This display of his work is at the Museum of Outdoor Art in Englewood Colorado. The museum is adjacent to a business office park, so there is a wonderful relationship between the primordial quality of the sculpture, and the surrounding environment. And it seemed important to show that. So although the first photograph, where the piece is centered in the frame, may be a better summation of the sculpture itself, shifting the framing so that some of the building show in the background give both contrast and context.
Next, I wanted to show the rhythm and sense of movement Patrick builds into his work. The view above has a sense of flatness to it, and really doesn’t have the kinetic quality of the work you feel when you are in its presence, so I moved to an oblique angle, and changed to a wider angle lens. I also experimented with shooting from eye level, and ground level to see if one or the other enhanced the sense of movement, scale or height.
I also wanted to show the relationship of the sculpture to the existing environment, so I moved to an even more oblique angle where you could see the way in which the work was woven into the existing trees.
Finally, I wanted to show the texture of the sculpture, so I moved in closer, and made several graphic compositions that highlighted the tactile quality of the piece.
It’s no different if you are shooting the Michelangelo “David” in Florence, or for that matter, the Parthenon in Athens. Take your time to play with camera angle and lens focal length to create an intimate representation of the art before you. That way, when you return home, you will have images that evoke the experience fully when you look at them in the weeks, months or years that follow.
Monday, May 19, 2008
Flip it
It's not uncommon for a situation to present itself where there are simple graphic elements that make a wonderful composition. But at the same time, since we do not control what already exists, we can only take the creative process so far in the capture stage with what is in front of our lens.
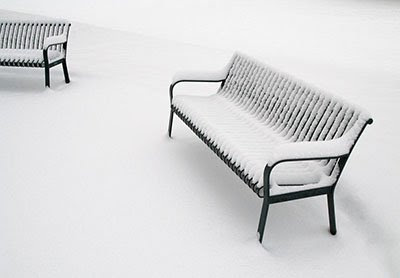
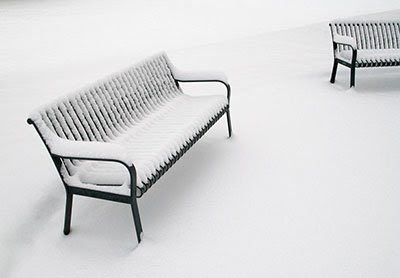
When I am given a situation like the one here, where a late spring storm reduces the elements to just the benches and the snow, I will work with lens choice and camera angle to make the composition as good as I can. Bu when I pull the image up on screen in Photoshop, I'll keep an open mind to what could make the image even stronger.
O of the concepts I often look at is the the way the eye moves through an image. There is a natural rhythm by which the eye enters a photograph, and leaves it, much as if we are reading text. For those of us who read from left to right, we look at visuals in the same way. So a composition that guides the eye into the image with ease from the left will be more pleasing than one that blocks that entry. And an image that keeps the viewer's eye within the image will have more impact than one that allows an easy escape.
Just look at the difference with how this image looks which the full bench on the left, and on the right.
The image with the bench on the left (which is how the scene really was), brings the eye in low in the left corner, and allows the eye to exit the image through the bench at the right. But by flipping the image, the eye is guided in high on the left, and naturally comes to rest at the full bench on the right. The result is that the eye lingers within the image to examine the details rather than pass through it.
So when you are looking at the composition of an image, take the time to flip it.
Wednesday, April 30, 2008
Waiting for the light
The expression “patience is a virtue” is clearly evident in doing landscape photography. I often find that the difference between a pleasing image and a powerful image is simply waiting for the light to add drama to the scene. It could be taking the time to allow a cloud to create interesting patterns or shadows as it passes overhead, or waiting for the sun to drop behind a rock to highlight a feature in the scene you are capturing.
Just look at the difference between the image below, and the image above. Though taken just a couple of minutes apart, a cloud passing overhead takes a picture that looks a bit flat, and creates more focus on the central part of the rocks in the image above. The result is that the eye is guided to the texture and shapes of the rocks in a better way, and this makes for a more impactful image.
Here’s another example. When I first saw this scene, and snapped the first picture, the light was flat. By waiting a few minutes for an opening in the clouds and allowing the light to travel across the land until it illuminated the rocks, I got better separation of the rock surfaces and greater depth overall.
There are times were we have to hurry, but when shooting landscapes, having patience to wait for the light is clearly worthwhile.
Sunday, April 27, 2008
The Biggest Filter
Often, I when I am teaching a workshop and ask why people are attending, someone will say “I take pictures, but I don’t seem to get in an image what I had in my mind at the time I did the shoot.”
This person is not alone in their lament. The reality is that the brain does an amazing job of filtering what we see, and thus what we end up with may not match the vision we had when we were attracted to a situation. True, there are other things that influence the image you end up with, such as cropping, angle of view, and choice of lens, just to mention a few.
But one of the biggest factors is how our brain edits the external and forces it into the box our desires have created for the fulfillment of our photographic ideals, whatever they may be.
I’m amazed at how often I drive by a location, and see a wonderful opportunity, only to return and find out there were power lines disrupting the clean lines of a building. Or a fire hydrant marring the simple lines of a street scene.
In this situation, I was driving on a one way street that had three lanes of traffic, and I was in the far left lane. I noticed a building on the right side of the street that had several fruit trees in bloom, and the contrast of the pink flowers against the rust colored exterior wall was striking. I decided I would return the next day when I could make some time to spend shooting.
On my return, I parked my car on a side street, turned the corner and walked alongside the scene I was so enamored with. To my dismay, there were stakes holding the trees in place, so I could not shoot from the top to the bottom of the tree. There was even a utility box next to one of the trees.
This is the point at which I remind myself of the big brain filter I carry around with me, and laugh at myself. And it is also the time where I think about what it was that brought me to this place to photograph in the first place, and see if I can synthesize that into a different image that still made the same point.
True, it would have been lovely to get a whole tree framed by the rust colored wall, but how else could I frame the image to give that contrast of pink and purple, light and shadow? I started with a wide angle lens, and looked at including a number of branches and a bevy of blooms. As I continued, I moved to a telephoto lens and kept reducing the picture to the essence of color and tonal contrast. Here are some of the results.
Are they better or worse than the symmetrical composition of a full tree framed by the building I saw in my mind? I’ll leave that for the viewer to decide. But the exercise in examining the core reasons for wanting to shoot the image allowed me to get around the big brain filter and get the essence of the image I had in my mind. And that's the lesson I want to share.
Monday, April 21, 2008
Always ready
I always have a camera with me. At least, a good point and shoot is in my daybag. But most of the time, I have a DSLR in the car with me. Here’s a good example of why I do it.
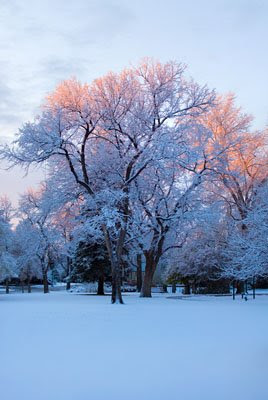
A late spring storm brought wet snow to our area, and beautiful coating of the white stuff on the branches of the trees. The look is completely different than that of mid winter, where the snow would not stick to the branches and just pile up below.
I was headed to a meeting, but stopped, grabbed this image, and continued on my way. It’s always good to be ready.
Thursday, April 10, 2008
Texture
Here’s a fun example of how to use texture to create an interesting image.
I was walking along a trail in the redrock country of Utah, surrounded on all sides by big, undulating stone shapes. By themselves, of course, they can be wonderful subjects. But when I saw this dead tree coming up from a group of rocks, the contrast in texture was stark, especially against the clouds that added yet a third texture.
Another treat was that there were three distinct values of light and dark (white in the clouds, midtones in the rocks, and near black in the tree) so there was great contrast as well. You’ll also note that I am using the rule of thirds, both horizontally in how I place the tree off to the right, and vertically by having the tree top two-thirds up the image.
The result is a nice convergence of simple elements where texture can be the hero of the image.
Subscribe to:
Posts (Atom)