Showing posts with label photography tips portrait photography. Show all posts

Friday, August 1, 2008

Using Open Shade to Make Better Photographs


Often, we have an opportunity to take a spontaneous photograph of a friend outdoors, on a bright sunny day. If the sun is high up in the sky, it's easy to end up with a picture where the person's eyes are in deep shadow, and they are squinting.

When a situation like that arises, it's time to look around for open shade. Maybe there is a tree close by that you can put the person under, or a doorway they can stand in (as in the example above).

Or maybe there is an overhang on a building. In the situation below, I put the subject just behind where the sun would have hit her face directly under the roofline of the shed. That way, the exposure was still at a high enough shutter speed that I could hand hold the camera, but I could get the benefit of the soft light provided by the overhang.


Whatever the options, look for opportunities to get your subject out of the harsh, overhead light, and into open shade. The results will certainly be worth the extra effort.

Wednesday, February 13, 2008

Analysis of a shoot part II-The shoot day


Having done the scout, I called the actor and asked him to meet me at the location at 7:30 AM, a little bit before the time when I think the light will be the most dramatic. When he arrives, we look at wardrobe, and we select something that feels casual, but elegant. Once he changes, we are in the window for light, and ready to go.

I start the shoot with him standing next to the edge of the building. Giving him a solid physical reference point is an easy way to get him warmed up since he has something he can lean against, and work off of.


The beginning of the session is, in my opinion, the most interesting part of the whole shoot because it’s when you establish the way you will work together. Not unlike meeting someone socially for the first time, it takes a little bit of time to get comfortable with each other, and understand how you will communicate. To get great images, it’s important to create a positive, encouraging environment where the subject is willing to relax, open up to the camera, and be creative.


I’ll generally start with things that don’t require a lot of the person, but are more about light and form. As we progress, I’ll encourage the subject, and compliment them on how they are performing. This invariably makes them more responsive, and as they soften, I’ll ask a bit more of them. “Smile. Make the expression more tender. Grit your teeth and make me feel like you are looking right through me.”
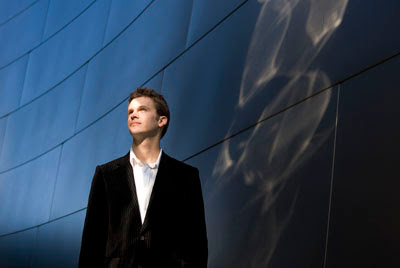


Giving good direction makes your subject feel confident that they are good hands, so even if you are not sure of what you want, make a suggestion with confidence. And if it doesn’t work, go on to the next idea. The key is to keep moving, and create a rhythm that propels you forward. All the while, look for the lighting, expressions and camera angles that will fulfill the concept you started with.


In the end, we worked for about two hours, feeling like we had explored all the possibilities the locations provided, and had a lot of fun along the way.

Saturday, January 26, 2008

Analysis of a shoot part I-Concept and Scout


How you approach a shoot clearly affects the images you get, so I thought it would be good to walk you through how I do a shoot from start to finish. The benefit is the same whether you are shooting a portfolio image for an actor, or intending to take a special picture of a friend or family member.

The first order of business is to come up with a concept for the image (or images) you are going to produce. What do you want to say about the person? Do you want to show their physical attributes? Their sense of humor? Their state of mind? I keep a reference file on my computer with images of paintings, sculptures and photographs that inspire me. The goal is not to copy, but rather to spur the thinking process.

Once you’ve got your idea in mind, think about the lighting and background that will serve those ideas best. Should the location be indoors or outdoors? Would hard or soft lighting be better?

Next, if I’m shooting on location, I’ll do a scout of potential sites. Sometimes you can set the shoot time based on the light at the location, but sometimes it is based on your subjects’ schedule. I take that into account in choosing the time of day to scout. I may not know a location at all, so in that case I will go there whenever it is convenient, and while shooting take good notes with compass headings and reference points. Many cameras have built in microphones, so I’ll shoot a picture, then say something like “Looking northeast from the the landing on the south side of the building, three feet from the left front edge of the first bench.” If the location is a broad landscape without a lot of obvious manmade landmarks, I’ll carry a GPS unit with me and mark the spots I shoot. In that case I would add “Shot at Waypoint 5.” New on the scene are devices that sync GPS positioning to specific images on your media card. I hope to test this technology and report on that soon.

Since I travel a lot, I also make sure I have the correct time set in my camera so I know when the scout picture was shot. All digital cameras will display the time and lens information in the EXIF files, so I can duplicate the look when I come back.

Since I did not know the actor I was going to shoot in advance, I set up a phone call in which we could talk a little bit about who he was, and how he was being positioned for roles. Based on that, I decided to shoot at the Walt Disney Concert Hall, where I could look for simple, graphic backgrounds that would give a sense of place, but make him the hero of the image. I always look for something people can relate to. That is, if I give them a wall or a tree, it gives them something to work with to create line and shape. It also makes it easier for talent to get into the session if they have a prop than if you have them just stand in open space.

Here are a few of the scout images.